A while ago I wrote a blog on Upper Cross Syndrome, complete with exercise videos on how to counter it. I said at the time that I would also write one for Lower Cross Syndrome to improve poor posture – and finally – here it is!
I don’t want to repeat the same information so I suggest you look at the first blog here to get the full explanation as it’s good to understand why you are doing something, that way you are more likely to do it. The same rules apply – you need to stretch the hypertonic (tight) muscles first before you do the exercises to strengthen the hypotonic (weak) muscles. The stretches are really important, so don’t just go straight to the strengthening exercises!
Lower Cross Syndrome posture
Here’s an illustration to help you visualise the posture (or the posture you could possibly be looking at in the mirror).
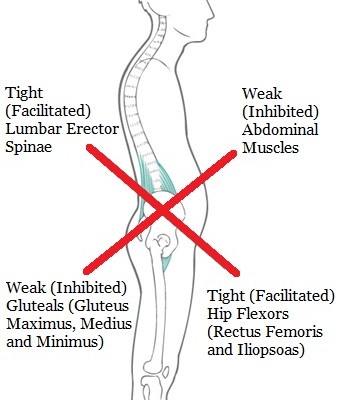
As with Upper Cross Syndrome, certain muscles are tight (hypertonic) while others are weak causing a posture that is results in pain, can look unappealing and is very common if you start looking for it.
Muscles involved with Lower Cross Syndrome
Tonic Muscles – Prone to Tightness or Shortness
Gastroc
Soleus
Tibialis Posterior
Hip Adductors
Hamstrings
Rectus Femoris
Iliopsoas
Tensor Fascia Lata
Piriformis
Thoraco-lumbar extensors
Quadratus Lumborum
Phasic Muscles – Prone to Weakness or Inhibition
Peroneus Longus & Brevis
Tibialis Anterior Vastus Medialis & Lateralis
Gluteus Maximus, Medius & Minimus
Rectus Abdominus
Many of these are very important, large postural muscles that may possibly be functioning incorrectly if your posture is not correct, however, with the correct stretching and strengthening exercises these muscles can improve in function which will result in improved musculoskeletal function and pain reduction (if not pain elimination). So – let’s get started!
S-T-R-E-T-C-H-E-S and stuff
When doing a stretch, hold the stretch in the suggested position for at least 20 seconds, then release. No bouncing, just a nice sustained stretch.
We are going to start with the foam roller on the IT Band.
The research on foam rolling the IT band is conflicted. Some states that doing this is of no help. Clinically, I have found it to be beneficial. Plus you can use these rollers for most muscles groups to work out the knots so experiment. (And yes – it really should be that painful to start with but the pain recedes quickly if you keep doing it regularly). You can also use them for core strengthening exercises.
We sell these at the clinic and quite honestly, I don’t know how I survived before I had one of these. They are very versatile and extremely effective. My advice would be – get one!
We are start stretching the calf muscles. Here is a simple stretch of the Gastroc and Soleus Muscles that you can do anywhere (you will also get the Tibialis Posterior slightly).
This next video demonstrates how to stretch the hip Adductor Muscles which are the large muscle group of the inner thigh.
Now for the Hamstring Muscles.
Then the opposing muscle from the Quadratus group of muscles, the Rectus Femoris. Make sure you tuck your tail bone (coccyx) under for this one – then you will really feel it.
This next video demonstrates how to stretch the Iliopsoas and also the Tensor Fascia Lata Muscles. This last muscle goes into the IT Band so don’t forget to foam roll first. This video looks as if it has been cut short, which it has but all of the needed information is on it. I shortened it as I gave too much information that would have been confusing.
Here are a couple of stretches for the Piriformis Muscles. Always a favourite!
This video shows stretches for the Quadratus Lumborum and Thoraco-lumbar Extensors.
Strengthening Exercises
Okay – stretching done. Now we can start strengthening the opposing muscles. We will start with the Tibialis Anterior (don’t want to confuse you with an exercise for the Peroneus muscles so we will stick with this one at the moment). You need a resistance band or something that will add resistance to the muscle as you work it. As with any strengthening exercise you need to do sets of repartitions and increase the number of reps and/or sets as you get stronger e.g. start with 3 sets of 10 repetitions? Here’s how…
Now for strengthening the Gluteal muscles and here’s Rich demonstrating how with the Romanian Deadlift. The Romanian Deadlift is a great exercise for the glut muscles. A good idea, to let your body know which muscles it is supposed to use, is to simulate the gluts by just prodding them. Don’t forget to have soft knees, back is straight as you reach forward slowly, you may feel the hamstrings as you do this, then focus on using your gluts as you come up quickly.
And another strengthening exercise, this one more specitically for the Gluteus Medius Muscles.
Lastly, here is a good way to start working your abdominal muscles with The Plank. Try to hold the Plank position for as long as you can whether that is 10 seconds, 60 seconds or longer. As always, doing it correctly is more important than doing it for longer but doing it incorrectly. The correct position means your tail bone (coccyx) is tucked under; your shoulders are stabilsed, on scapular winging. Ifyou are looking in a mirrior you would see your body in a perfectly straight line.
If you follow these recommendations you have the opportunity to have great posture, wonderful musculoskeletal function resulting in less chance of injury and pain.
I would always recommend you seek advice from a qualified practitioner to help you reach your health goals, whatever they are.
Written by Anne French, Chiropractor and Functional Medicine Practitioner.